Sunday, March 25, 2012

Gift card holders

A group of my super talented and crafty friends got together last month in Florida. I was not able to attend but wanted to send down a gift for each of the girls. So I picked up some gift cards and just "had" to make some card holders (after all, these are some of the craftiest ladies that I know!!).

Anyway, I made these little card holders once at a scrapbooking convention. So I used the template from what I saw there to create 13 card holders for the Michaels or Joanns gift cards that were included.


First, I cut the base paper 3 1/2 x 12 inches (for these holders I used plain white cardstock as the base).


Then score the lines (3.5", .5", 3.75", 1.5")


Now you have the base of the gift card holder.

Then cut a fun double sided paper at 2.5" x 12" and making the exact same scoring lines as above.  I typically use the left over double sided paper to cut into .5 inch x 4.5 inch strips that I use as both the handle and also the piece to hold in the gift card. To make the handle I attached the .5 inch strip to the inside of the 2.5'x x 12", flip it over the top and attach it to the other inside as shown below.


Once the handle is attached, then glue down the strip to the base cardstock. The gift holder is now taking shape.


I used spellbinder dies to cut out cute scalloped squares (one in plain white the other in the same double sided cardstock.  You can also use punches, but it is a fun and easy element to add a little something to the front of the gift card holders.


Then attach the squares to the front of the card holder.  Using a hole punch, punch holes on the sides of the squares. We are going to use ribbons to hold the card holder together.


I also attached one of the .5 strips on the insides of the card holder to hold the gift card. Anyway, here is the finished product...


And a side view:

And finally all of them packed in a box ready to ship to Florida


I hope you enjoyed this quick tutorial on how to make a fun gift card holder.


Sunday, February 12, 2012

Brother birthday card

Well it is that time of year, my older brothers birthday. I always struggle to make him a card because, well, he's male.  But I am very lucky that both my brothers love what I do and fully support me, so any card that I make I know that he will cherish. I picked up this stamp from Michael's $1 bin and it was just perfect. My brother loves coffee and I am including a gift card for Dunkin Donuts in the card. And second he is my best friend.

I stamped it using memento ink and colored it using my new promarkers.  The papers I used are from DCWV Sweet Tooth collection and Core'dinations. And of course some yummy twine from the Twinery.


Its not the traditional birthday card but I know that he will love it.  I used some perfect pearls on the flowers.


And finally the inside:


Hope you like it!

Saturday, January 21, 2012

Hiking

I am finally catching up on some scrapbooking and made this layout from a day trip last year. I tend to do double page layouts when I scrap since I like to be uniform, matching, etc.  I guess that is just how my brain works. Anyway, we go camping a lot and like to explore nature and the beautiful scenery that Mother Nature has created for us.  We took the boys hiking along the Kancamangus Highway in NH and stopped at a trail head. The boys had so much fun exploring the waterfalls and river, and we took lots of photos.

I did a color blocking technique and used one of my favorite companies K & Co. The stack I used is called "Happy Trails".  Someone once told me that the best way to mix patterned papers was to use papers from the same stack. And its true. The colors match perfectly for using multiple papers. And I FINALLY got to use my camping cricut solutions cartridge. I've had it since it came out and this is the first time I actually used it, ha ha.


I used multiple layers to create the trees and pop dots to make them stick out more. I also created multiple layers for the sign and pop dotted that as well. And I tend to use at least 6 or 7 pictures for each double sided layout, as I take so many pictures I pick out my favorite from each and then end up on the page.


Well there you have it. A fun and easy layout to make to showcase family memories. The hardest part for me is picking the papers. I mean lets be honest, my heart beats when I cut some pretty paper, I won't lie. But once you put it all together it makes it all worthwhile. And I only used 2 pieces of paper from that stack, since it is double sided. So come one, use that pretty paper.

PS - the plain cardstock was left over papers from other projects. So really I used 2 pieces of white cardstock, 2 pieces of patterned cardstock and the rest was using pieces from leftovers. Not bad right?

Saturday, January 7, 2012

Snowman frame

I was part of a gift exchange with a group of very talented crafters this past holiday season. Part of the gift exchange was to make a homemade item for your partner. I was really nervous about making something for someone else, as this group of girls have more talent than I do (I mean seriously, my preschooler is more creative than I am).  I thought it would be nice to make something that she could hang if she wanted and was festive for the holiday season.  My partner loves the color red and her favorite season is winter, so I chose to make a snowman frame for her.

I found the frame at Hobby Lobby (boy I didn't know how hard it would be to find the perfect frame once you have a project in mind), but this one was square, 8x8 with a frosted glass front. Then I used some of my favorite Christmas stack, from recollections, and used that as the backdrop. I used pearls on the paper to add a little something.  I cut the snowman out of Christmas Cards Cricut cartridge and used red pearls as the buttons. I got a chance to use my Peachy Keen stamps for the face and used a little chalk to make the cheeks rosy.  The snowman was then put on the frame and pop dotted to make it stand out more. Finally I added some snowflakes for a little fun. 


On the frame itself I used a wide red ribbon and made it into a ruffle and added some flowers that were quilled using my cuddlebug and quilling tools.

Here it is.


I hope my secret partner likes it!  It was a lot of fun to make! Take care everyone

Sunday, December 18, 2011

Thinking of you

So a dear friend of mine lost her 18 year old nephew in a car wreck in TX last month. I thought I would send her a quick card to let her know that I am thinking of her.  She has always been there for me, so making this card was something I could do to show her how much I care for her.

It was pretty simple. I got this paper pack for $4.50, DCWV 12x12 Green Tea stack at Marshalls. I had no idea that Marshalls would have paper until my good friend Allison over at http://papercraftweekendchallenge.blogspot.com/ "informed" me that they have some great deals. And seriously, $4.5 for a full stack of paper... *drool*

Anyway, where was I. Right, the card. So making cards can be pretty easy or complex, just depending on how much time you have to put into it. For me, time is not on my side right now, so I had to make something quick.  So I took one sheet of white 8.5 by 11 cardstock and cut it in half, folded it and taa daa, I had my card base. Then I used one of my favorite Martha Stewart punches along the border, so pretty. And my spellbinder dies. A couple stamps later, glue it down and it was done.  Quick and simple, but I know she'll love it


And for the inside I used a sheet of the blue cardstock and stamped a swirl to it, just to give it a little texture or something


And finally my finishing stamp, one I got off this great seller from eBay. Love his selection and prices are amazing! Seriously!! 


Well thanks for looking!  I have another fun project to post for you guys. This is something that I love to do, more than pages. It is an altered item for a gift exchange. So be on the lookout, once my busy season at work ends, I will be back to creating and crafting all the time 


Wednesday, November 9, 2011

Around the track

Hello everyone! Sorry for the delay in posting my next project. We lost power for multiple days and it was hard to get online, then I went away for the weekend on a scrap retreat, working lots of hours... (Insert lots of random boring excuses here, haha)

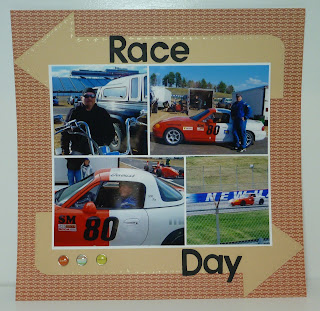
Anyway, I worked on a page before the power went out.  It is kinda boring but I wanted to share with everyone. My little brother Jason is into racing cars. He belongs to a sports car club racing league and is a really good driver. (Seriously, you think scrapbooking is expensive, try racing cars! OUCH!!!).  My dad was always his chief crew member and my older brother was part of the crew. When my dad passed away, my older brother Matt became the chief crew member. Matt painted the car in a orange and white check pattern in memory of my dad (my dad had painted Jasons first race car those colors and he always loved them). For the first race of the season I went up to the track to watch them both in action. I was starting a new scrapbook and needed a single layout. So I started by picking the pictures that I wanted to use and paper. And what a great way to start a new album but a fun family memory at the track.

Here is a sampling of the supplies that I used. SEI paper pack called "En Route", the black paper is from AC Cardstock and the sand colored paper is from Core'dinations "Sandy Tan".  I also used some brads from My Minds Eye (Abbey Road Travel Kit), my gypsy and cricut.


I cut some arrows out from Graphically Speaking cricut cartridge on the sandy tan paper and the font from Nates ABCs in black paper.  Just slapped the photos on and tada!! Quick and simple.


To finish it off I just added 3 brads and drew arrows using a silver pen around the large tan arrows.


As a mom with 2 little boys at home, I struggle some times with the big boys layouts. I think this one, although simple, will do just fine in my album.

Rebecca

Friday, October 28, 2011

Welcome!!

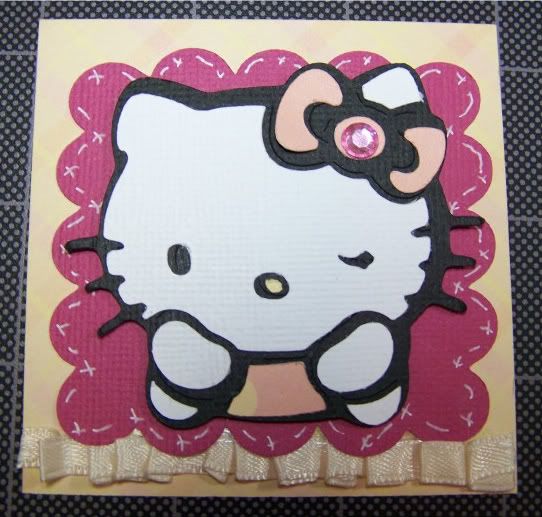
So my good friends over at the papercraft weekend challenge group have encouraged me to start a blog. So here you have it . I hope to share with you some projects that I am currently working on as well as some old ones. To get us started, I thought I would post my calling card as a member of the cricut circle. Using my cricut has really opened up the world of paper crafting for me. No longer do I run out of the "A, E, N" stickers, now I can cut the ones that I want to use, with the right size, right color, its awesome.  I went to a meet up in PA and handed these out to fellow circle members. 

I used Hello Kitty Font and Mini Mono for the scalloped square.


I look forward to sharing more projects with you!

Rebecca